check engine light Ram 1500 2014 Get to Know Guide
[x] Cancel search | Manufacturer: RAM, Model Year: 2014, Model line: 1500, Model: Ram 1500 2014Pages: 252, PDF Size: 6.74 MB
Page 57 of 252
4. Enter your email address into the radio touchscreen.
5. A message will display on the touchscreen indicating your email submission wasaccepted.
6. At home, or wherever you access your email, look for an email from Uconnect
®
Access that contains your personalized registration link. If you don't see it, check
your spam or junk email folder. Open the email and click on the link to continue
registering online.
NOTE:
For security reasons, this link is valid for 72 hours from the time you submit your
email address into the radio touchscreen. If the link has expired, start the process
over (see step 1).
7. You are now registered for your Uconnect
®Access Trial! Apps will be downloaded
the next time you start your vehicle. It may take over 30 minutes for all of the
Apps to install. If the Apps have not appeared after 72 hours, please contact
Uconnect
®Care at 855-792-4241.
8. Get to know Uconnect
®Access! We recommend:
• Go to moparownerconnect.com and log in using the email address and password you established while registering. Go to the Learn & Use tab for complete
information on using Uconnect
®Access.
• If you have a smartphone, download the Uconnect
®Access App and set up your
Via Mobile features. See instructions below.
Download The Uconnect® Access App
If you own a compatible Apple or Android®powered device, the Uconnect Access
App allows you to remotely lock or unlock your doors, start your engine or activate
your horn and lights from virtually anywhere (Vehicle must be within the United
States and have network coverage). You can download the App from Mopar Owner
Connect or from the Apple App or Google Play store. For Uconnect
®phone
compatibility - visit UconnectPhone.com or call 1–877–855–8400.
Set Up Your Via Mobile Profile — If Equipped
Setting up your Via Mobile profile means entering your login information for each app
so that they can work in your vehicle. Complete your Via Mobile Profile online during
registration of your Uconnect
®Access system. Access this page by logging into your
Mopar Owner Connect account (moparownerconnect.com), going to Edit Profile,
then Via Mobile Profile.
If you already have an account with these apps, click “SetUp” to enter your information.
If you do not have an account, you can create a new one.
ELECTRONICS
55
Page 119 of 252
PROGRAMMABLE FEATURES
Programmable Features
The EVIC can be used to view or change the following settings. Press the UPor
DOWN
button until System Setup displays, then press the RIGHTbutton.
Scroll through the settings using the UP or DOWN buttons. Press the RIGHT
button to change the setting. Press the BACK/LEFTbutton to scroll back to a
previous menu or sub menu.
• Radio Info • Trip Info
• Fuel Economy Info • Tire Pressure
• Cruise Control Info • Vehicle Info
• Digital Vehicle Speed • Stored Warning Messages
• Stop/Start • Turn Menu OFF
• Screen Setup • Trailer Tow
Uconnect® Customer Programmable Features
The Uconnect®system allows you to access Customer Programmable feature settings
such as Display, Clock, Safety/Assistance, Lights, Doors & Locks, Auto-On Comfort &
Remote Start, Engine Off Operation, Compass Settings, Audio, Trailer Brake, Phone/
Bluetooth
®, Suspension and SiriusXM Setup and System Information through soft-keys.
•Press the SETTINGS button (Uconnect®5.0), or press the “Apps” button (Uconnect®
8.4) located near the bottom of the touchscreen, then press the “Settings” button on the
touchscreen to access the Settings screen. When making a selection, scroll up or down
until the preferred setting is highlighted, then press and release the preferred setting
until a check-mark appears next to the setting, showing that setting has been selected.
The following feature settings are available:
• Display • Clock
• Safety/Assistance • Doors & Locks
• Auto-On Comfort & Remote Start • Engine Off Options
• Phone/Bluetooth
®• Audio
• Lights • SiriusXM Setup
• Compass (Uconnect
®5.0) • Trailer Brake
• Suspension • System Information
• Units • Voice
NOTE:
Depending on the vehicles options, feature settings may vary.
ELECTRONICS
117
Page 146 of 252

NOTE:
When shifting out of transfer case NEUTRAL (N), turning the engine OFF is not
required, but may be helpful to avoid gear clash. With the 8-speed automatic
transmission, the engine must remain running, since turning the engine OFF will
shift the transmission to PARK (and the transmission must be in NEUTRAL for the
transfer case to shift out of NEUTRAL).
5. Turn the engine OFF. Shift automatic transmission into PARK. On 8-speedtransmissions the shifter will automatically select PARK when the engine is
turned off.
6. Release the brake pedal (and clutch pedal on a manual transmission).
7. Disconnect vehicle from the tow vehicle.
8. Start the engine.
9. Press and hold the brake pedal.
10. Release the parking brake.
11. Shift the transmission into gear, release the brake pedal (and clutch pedal on manual transmissions), and check that the vehicle operates normally.
NOTE:
With electronic shift transfer case:
• Steps 3 and 4 are requirements that must be met prior to pressing the button to shift out of NEUTRAL (N), and must continue to be met until the shift has been
completed. If any of these requirements are not met before pressing the button or
are no longer met during the shift, the NEUTRAL (N) indicator light will flash
continuously until all requirements are met or until the button is released.
• The ignition switch must be in the ON/RUN position for a shift to take place and for the position indicator lights to be operable. If the ignition switch is not in the
ON/RUN position, the shift will not take place and no position indicator lights will
be on or flashing.
• A flashing NEUTRAL (N) position indicator light indicates that shift requirements have not been met.
UTILITY
144
Page 147 of 252

DIESEL ENGINE BREAK-IN RECOMMENDATIONS
• The 3.0 turbocharged diesel engine does not require a break-in period due to itsconstruction. Normal operation is allowed, providing the following recommenda-
tions are followed:• Warm up the engine before placing it under load.
• Do not operate the engine at idle for prolonged periods.
• Use the appropriate transmission gear to prevent engine lugging.
• Observe vehicle oil pressure and temperature indicators.
• Check the coolant and oil levels frequently.
• Vary throttle position at highway speeds when carrying or towing significant
weight.
NOTE:
Light duty operation such as light trailer towing or no load operation will extend the
time before the engine is at full efficiency. Reduced fuel economy and power may be
seen at this time.
• The engine oil installed in the engine at the factory is a high-quality energy conserving type lubricant. Oil changes should be consistent with anticipated
climate conditions under which vehicle operations will occur. The recommended
viscosity and quality grades are shown under “FLUIDS AND CAPACITIES”, under
“MAINTAINING YOUR VEHICLE” in this User Guide. NON-DETERGENT OR
STRAIGHT MINERAL OILS MUST NEVER BE USED.
DIESEL ENGINE STARTING PROCEDURES
Normal Starting Procedure
1. Apply the parking brake.
2. Ensure the shift lever is in the PARK position.
3. Press and hold the brake pedal while pressing the ENGINE START/STOP button
once.
4. The system will take over and attempt to start the vehicle. If the vehicle fails to start, the starter will disengage automatically after 30 seconds.
5. If you wish to stop the cranking of the engine prior to the engine starting, press the button again.
6. Check that the oil pressure warning light has turned off.
7. Release the parking brake.
1500 3.0L DIESEL
145
Page 157 of 252
DIESEL ENGINE BREAK-IN RECOMMENDATIONS
The Cummins®turbocharged diesel engine does not require a break-in period due to
its construction. Normal operation is allowed, providing the following recommenda-
tions are followed:
• Warm up the engine before placing it under load.
• Do not operate the engine at idle for prolonged periods.
• Use the appropriate transmission gear to prevent engine lugging.
• Observe vehicle oil pressure and temperature indicators.
• Check the coolant and oil levels frequently.
•
Vary throttle position at highway speeds when carrying or towing significant weight.
NOTE:
Light duty operation such as light trailer towing or no load operation will extend the
time before the engine is at full efficiency. Reduced fuel economy and power may be
seen at this time.
Because of the construction of the Cummins
®turbocharged diesel engine, engine
run-in is enhanced by loaded operating conditions which allow the engine parts to
achieve final finish and fit during the first 6,000 miles (10 000 km).
DIESEL ENGINE STARTING PROCEDURES
Engine Block Heater
For ambient temperatures below 0°F (-18°C), engine block heater usage is recom-
mended.
For ambient temperatures below –20°F (-29°C), engine block heater usage is required.
The engine block heater cord is routed under the hood to the right side and can be
located just behind the grille near the headlamp.
Connect the heater cord to a ground-fault interrupter protected 110–115 volt AC
electrical outlet with a grounded, three-wire extension cord.
NOTE:
The block heater will require 110 volts AC and 6.5 amps to activate the heater element.
The block heater must be plugged in at least one hour to have an adequate warming
effect on the coolant.
6.7L CUMMINS® DIESEL
155
Page 172 of 252
Please note that the TPMS is not a substitute for proper tire maintenance, and it is
the driver’s responsibility to maintain correct tire pressure, even if under-inflation has
not reached the level to trigger illumination of the TPMS low EVIC display.
Your vehicle has also been equipped with a TPMS malfunction indicator to indicate
when the system is not operating properly. The TPMS malfunction indicator is
combined with the low tire pressure telltale. When the system detects a malfunction,
the telltale will flash for approximately one minute and then remain continuously
illuminated. This sequence will continue each time the vehicle is restarted as long as
the malfunction exists.
When the malfunction indicator is illuminated, the system may not be able to detect
or signal low tire pressure as intended. TPMS malfunctions may occur for a variety of
reasons, including the installation of replacement or alternate tires or wheels on the
vehicle that prevent the TPMS from functioning properly. Always check the TPMS
malfunction telltale after replacing one or more tires or wheels on your vehicle, to
ensure that the replacement or alternate tires and wheels allow the TPMS to continue
to function properly.
NOTE:
Tire pressures change by approximately 1 psi (7 kPa) per 12° F (7° C) of air
temperature change. Keep this in mind when checking tire pressure inside a garage,
especially in the Winter. Example: If garage temperature is 68°F (20°C) and the
outside temperature is 32°F (0°C), then the cold tire inflation pressure should be
increased by 3 psi (21 kPa), which equals 1 psi (7 kPa) for every 12°F (7°C) for this
outside temperature condition.
CAUTION!
The TPMS has been optimized for the original equipment tires and wheels. TPMS
pressures and warning have been established for the tire size equipped on your
vehicle. Undesirable system operation or sensor damage may result when using
replacement equipment that is not of the same size, type, and/or style. Aftermarket
wheels can cause sensor damage. Do not use tire sealant from a can, or balance
beads if your vehicle is equipped with a TPMS, as damage to the sensors may result.
- Engine Temperature Warning Light
This light warns of an overheated engine condition.
If the light turns on and a warning chime sounds while driving, safely pull over and
stop the vehicle. If the A/C system is on, turn it off. Also, shift the transmission into
NEUTRAL and idle the vehicle. If the temperature reading does not return to normal,
turn the engine off immediately.
We recommend that you do not operate the vehicle or engine damage will occur. Have
the vehicle serviced immediately.
WHAT TO DO IN EMERGENCIES
170
Page 173 of 252

WARNING!
A hot engine cooling system is dangerous. You or others could be badly burned by
steam or boiling coolant.
BRAKE- Brake Warning Light
This light monitors various brake functions, including brake fluid level and parking
brake application. If the brake light turns on it may indicate that the parking brake is
applied, that the brake fluid level is low, or that there is a problem with the anti-lock
brake system reservoir.
If the light remains on when the parking brake has been disengaged, and the fluid
level is at the full mark on the master cylinder reservoir, it indicates a possible brake
hydraulic system malfunction or that a problem with the Brake Booster has been
detected by the Anti-Lock Brake System (ABS)/Electronic Stability Control (ESC)
system. In this case, the light will remain on until the condition has been corrected.
If the problem is related to the brake booster, the ABS pump will run when applying
the brake and a brake pedal pulsation may be felt during each stop.
The dual brake system provides a reserve braking capacity in the event of a failure to
a portion of the hydraulic system. A leak in either half of the dual brake system is
indicated by the Brake Warning Light, which will turn on when the brake fluid level
in the master cylinder has dropped below a specified level. The light will remain on
until the cause is corrected.
Vehicles equipped with the Anti-Lock Brake System (ABS), are also equipped with
Electronic Brake Force Distribution (EBD). In the event of an EBD failure, the Brake
Warning Light will turn on along with the ABS Light. Immediate repair to the ABS
system is required.
Operation of the Brake Warning Light can be checked by turning the ignition switch
from the OFF position to the ON/RUN position. The light should illuminate for
approximately two seconds. The light should then turn off unless the parking brake
is applied or a brake fault is detected. If the light does not illuminate, have the light
inspected by an authorized dealer.
The light also will turn on when the parking brake is applied with the ignition switch
in the ON/RUN position.
NOTE:
This light shows only that the parking brake is applied. It does not show the degree
of brake application.
WARNING!
Driving a vehicle with the red brake light on is dangerous. Part of the brake system
may have failed. It will take longer to stop the vehicle. You could have a collision.
Have the vehicle checked immediately.
WHAT TO DO IN EMERGENCIES
171
Page 174 of 252

- Malfunction Indicator Light (MIL)
The Malfunction Indicator Light (MIL) is part of an onboard diagnostic system called
OBD II that monitors engine and automatic transmission control systems. The light
will illuminate when the key is in the ON/RUN position before engine start. If the bulb
does not come on when turning the key from OFF to ON/RUN, have the condition
checked promptly.
Certain conditions, poor fuel quality, etc., may illuminate the light after engine start.
The vehicle should be serviced if the light stays on through several of your typical driving
cycles. In most situations, the vehicle will drive normally and will not require towing.
CAUTION!
Prolonged driving with the Malfunction Indicator Light (MIL) on could cause damage
to the engine control system. It also could affect fuel economy and driveability. If the
MIL is flashing, severe catalytic converter damage and power loss will soon occur.
Immediate service is required.
WARNING!
A malfunctioning catalytic converter, as referenced above, can reach higher tempera-
tures than in normal operating conditions. This can cause a fire if you drive slowly or
park over flammable substances such as dry plants, wood, cardboard, etc. This could
result in death or serious injury to the driver, occupants or others.
- Electronic Stability Control (ESC) OFF Indicator Light
The ESC OFF indicator will illuminate when the Electronic Stability Control (ESC) is
turned off.
- Charging System Light
This light shows the status of the electrical charging system. If the charging system light
remains on, it means that the vehicle is experiencing a problem with the charging
system.
We recommend you do not continue driving if the charging system light is on. Have
the vehicle serviced immediately.
- Oil Pressure Warning Light
This light indicates low engine oil pressure. If the light turns on while driving, stop
the vehicle and shut off the engine as soon as possible. A chime will sound for four
minutes when this light turns on.
We recommend you do not operate the vehicle or engine damage will occur. Have the
vehicle serviced immediately.
WHAT TO DO IN EMERGENCIES
172
Page 175 of 252

- Anti-Lock Brake (ABS) Light
This light monitors the Anti-Lock Brake System (ABS). The light will turn on when the
ignition switch is turned to the ON/RUN position and may stay on for as long as four
seconds.
If the ABS light remains on or turns on while driving, it indicates that the Anti-Lock
portion of the brake system is not functioning and that service is required. However, the
conventional brake system will continue to operate normally if the BRAKE warning light
is not on.
If the ABS light is on, the brake system should be serviced as soon as possible to
restore the benefits of Anti-Lock brakes. If the ABS light does not turn on when the
ignition switch is turned to the ON/RUN position, have the light inspected by an
authorized dealer.
- Electronic Throttle Control (ETC) Light
This light informs you of a problem with the Electronic Throttle Control (ETC) system.
If a problem is detected, the light will come on while the engine is running. Cycle the
ignition when the vehicle has completely stopped and the shift lever is placed in the
PARK position; the light should turn off.
If the light remains lit with the engine running, your vehicle will usually be drivable;
however, see an authorized service center immediately. If the light is flashing when the
engine is running, immediate service is required and you may experience reduced
performance, an elevated/rough idle or engine stall and your vehicle may require towing.
- Air Bag Warning Light
This light will turn on for four to eight seconds as a bulb check when the ignition
switch is first turned to the ON/RUN position. If the light is either not on during
starting, stays on, or turns on while driving, have the system inspected at an
authorized dealer as soon as possible. Refer to “Occupant Restraints” in “Things To
Know Before Starting Your Vehicle” of your Owner’s Manual for further information.
NOTE:
The Air Bag System is designed to be maintenance free.
- SERV (Service) 4WD Indicator Light
The SERV 4WD light monitors the electric shift four-wheel drive system. If the SERV
4WD light stays on or comes on during driving, it means that the four-wheel drive
system is not functioning properly and that service is required.
For vehicles equipped with a premium cluster this indicator will display in the
Electronic Vehicle Information Center (EVIC).
WHAT TO DO IN EMERGENCIES
173
Page 217 of 252
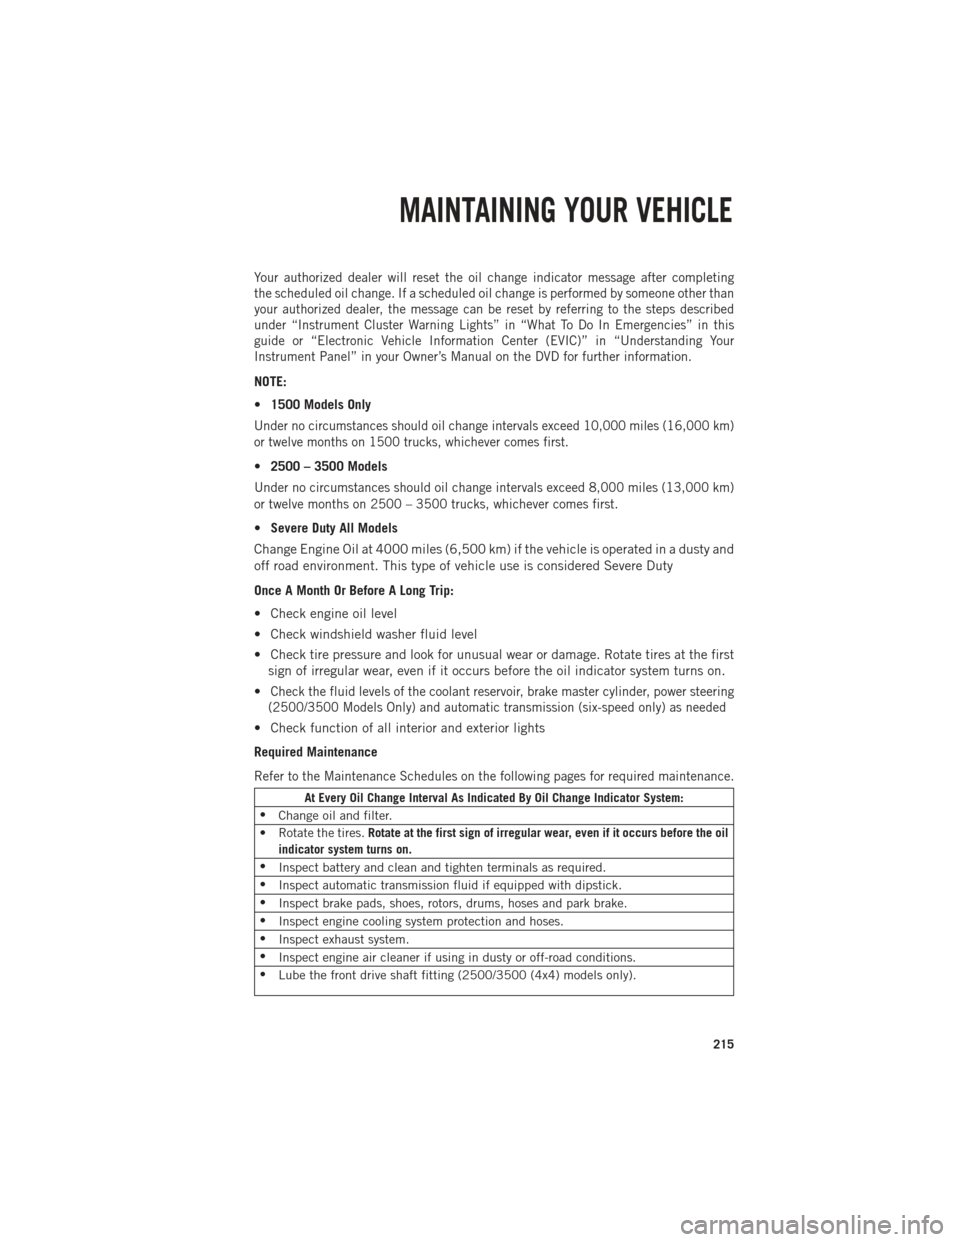
Your authorized dealer will reset the oil change indicator message after completing
the scheduled oil change. If a scheduled oil change is performed by someone other than
your authorized dealer, the message can be reset by referring to the steps described
under “Instrument Cluster Warning Lights” in “What To Do In Emergencies” in this
guide or “Electronic Vehicle Information Center (EVIC)” in “Understanding Your
Instrument Panel” in your Owner’s Manual on the DVD for further information.
NOTE:
•1500 Models Only
Under no circumstances should oil change intervals exceed 10,000 miles (16,000 km)
or twelve months on 1500 trucks, whichever comes first.
•2500 – 3500 Models
Under no circumstances should oil change intervals exceed 8,000 miles (13,000 km)
or twelve months on 2500 – 3500 trucks, whichever comes first.
•Severe Duty All Models
Change Engine Oil at 4000 miles (6,500 km) if the vehicle is operated in a dusty and
off road environment. This type of vehicle use is considered Severe Duty
Once A Month Or Before A Long Trip:
• Check engine oil level
• Check windshield washer fluid level
• Check tire pressure and look for unusual wear or damage. Rotate tires at the first sign of irregular wear, even if it occurs before the oil indicator system turns on.
•
Check the fluid levels of the coolant reservoir, brake master cylinder, power steering
(2500/3500 Models Only) and automatic transmission (six-speed only) as needed
• Check function of all interior and exterior lights
Required Maintenance
Refer to the Maintenance Schedules on the following pages for required maintenance.
At Every Oil Change Interval As Indicated By Oil Change Indicator System:
• Change oil and filter.
• Rotate the tires. Rotate at the first sign of irregular wear, even if it occurs before the oil
indicator system turns on.
• Inspect battery and clean and tighten terminals as required.
• Inspect automatic transmission fluid if equipped with dipstick.
• Inspect brake pads, shoes, rotors, drums, hoses and park brake.
• Inspect engine cooling system protection and hoses.
• Inspect exhaust system.
• Inspect engine air cleaner if using in dusty or off-road conditions.
• Lube the front drive shaft fitting (2500/3500 (4x4) models only).
MAINTAINING YOUR VEHICLE
215